Bantu Knots are defensive knot that serves two purposes. They keep your hair secure while you sleep and out of the way when you’re moving around. But a Bantu Knot Out will also give you breath-taking curls.
From your favorite celebrities to the five-year-old next door, everyone is sporting this 90s style that is making a comeback.
Although it could be intimidating to wear, this striking appearance surely boosts the wearer’s self-confidence. Although it might seem overwhelming, achieving a Bantu knots hairstyle is easier than it seems.
Discover what Bantu knots are, how to prepare for them, and how to tie one by scrolling down. We have detailed instructions on how to tie Bantu knots on a variety of hair types!
Why Do Bantu Knots Exist?
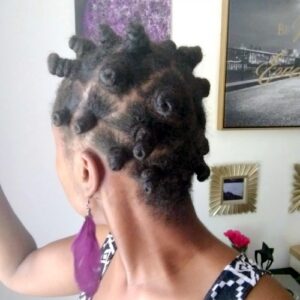
African ladies are thought to be the originators of the Bantu knot hairstyle. It is worn by ladies with curly hair as a protective style.
Additionally, it allows people to style their hair naturally. Additionally, once you’ve worn out the knots, you may undo them to achieve a stunning curly hair appearance known as a Bantu knot.
Thus, it’s truly two hairstyles in one! Sort of.
Instructions for Preparing Hair for Bantu Knots
Items Needed:
- Shampoo
- mask for deep-conditioning hair
- Conditioner
- Your choice of virgin olive, coconut, or jojoba oil for hair
- Maintaining conditioner
- Mousse, a defining curl cream, or a setting lotion
- Edge management
- an expansive comb
- a rat-tail brush
- an animal-hair brush made of wood
- Bobby or hairpins
- a painless hair tie
Step 1:
Gently shampoo and condition your hair. Other than what you already use, no additional hair care products are required.
Step 2:
- After shampooing, untangle your hair! Fill your hair with conditioner to achieve this.
- This provides your hair slide, which makes it simpler to style and will stop any hair breakage while you are detangling.
- Create small parts in your hair to make detangling easier and stop damage by doing so.
- Start by using your fingers to untangle. Then, using a wide-toothed comb or detangling brush, carefully work your way up from the bottom of your hair.
- Do this to all of your hair.
- After detangling, apply whatever hair products you normally apply to your hair.
Step 3:
Allow your hair to air dry to about an 80% dryness factor.
- You don’t want hair that is completely damp because it will take a very long time to dry after styling.
- Additionally, because dry hair is more prone to breakage and might not hold the style properly, you shouldn’t do this on it.
- The Bantu knot-out style benefits from having slightly damp hair because if the hair dries in the Bantu knot style, it will retain the curly shape when it is pulled down.
Bantu Knots: The Guides
1. On Natural Hair Bantu Knots

-
Step 1
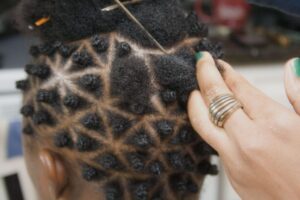
Part your hair into pieces with a rattail comb. The length of your hair and the style you want to achieve will determine how wide these portions are.
-
Step 2
Coat the area you are working on with hair cream. This aids in the formation of the knots and maintains their form.
Pro tip
However, hair cream should only be used sparingly because it also adds moisture to the hair, which could prolong drying time or result in unwanted product buildup.
-
Step 3
Hold the hair segment you are working with as closely to the roots as you can. As you twist the hair, it goes up in length.
-
Step 4
Keep twisting the part. You can start winding it around itself at this point or keep twisting it, and the hair will coil around itself until it feels tight.
-
Step 5
Continue till you reach the ends of the tresses once the miniature coiled bun has started to take shape.
-
Step 6
To secure the Bantu knot, round its base with the ends of your hair.
If you discover that the knot is too loose or your hair is not staying in place, use a bobby pin to secure it by inserting it through the base of the Bantu knot.
You can use painless hair ties to hold them if you don’t like bobby pins.
-
Step 7
Repeat steps two through six on each portion of your hair.
-
Step 8
Apply oil to your scalp’s exposed areas to keep them hydrated.
-
Step 9
Use the boar bristle brush to style and smooth down your edges after applying edge control or hair gel.
2. Short Hair How To Do Bantu Knots
 step 1
The first step is to apply leave-in conditioner to freshly washed hair.
step 2
The second step is to Use a wide-tooth comb to comb your hair.
Step 3
After applying leave-in conditioner or water, your hair should be moist but not drenched.
step 4
Using the rat-tail comb, split off your short hair into little portions.
step 5
Make designer or straightforward sections with the rat-tail comb.
step 6
Spray the hair with mousse or setting lotion.
Step 7
: Form a circle with your hair by rolling or twisting it with your fingers.
step 8
Apply extra product to the end of the rolled part, then tuck your hair in and hold firmly.
Step 9
Smack in the middle of the knot with a bobby pin.
Step 10
Continue until you have all the tiny Bantu knots you desire for each region of hair.
3. For Hair Transitioning How To Do Bantu Knots

Step 1
: Instead of letting your hair dry to 80% because transitional hair has two different textures, only let it get to about 60%-70% dry.
This is because your naturally curly roots will dry slower than your straighter, relaxed ends, and you don’t want to twist hair that is halfway dried.
At the stress point, where your hair turns from wavy to straight, this may result in breaking.
Step 2:
Divide into designer or straightforward components. Then divide your hair into large to medium-sized parts.
Step 3:
To help the Bantu knots stay in place, apply curl-defining cream or setting lotion to each piece of hair.
Step 4:
With your fingers, twist one part of your hair.
Step 5:
Use your fingers to twist each segment of hair until a Bantu knot forms and coils over itself.
Step 6:
Because the hair is curly at the root, use a hairpin or bobby pin in place of wrapping the ends around the base of the knot.
The ends are relaxed and delicate in this situation, so you don’t want to wrap them around the base.
They risk breaking off while wrapped tightly around the Bantu knot’s base.
Step 7
Use a hooded dryer or let your hair air dry to finish
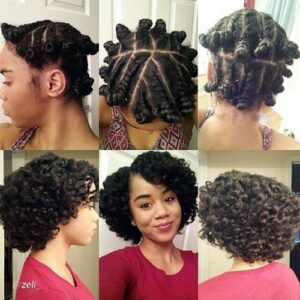
4. How To Do the Bantu Knots Out
Step. 1
Your hair should be mostly dry before applying this style, in part because of this.
To make sure they are dried before removing them, you should inspect each knot separately.
You can wear your hair in its current style until all of the knots are completely dry, or you can sit under a hooded dryer to speed up the drying process.
Step 2
After the hair has dried, you should take out any hairpins or ties that you used to secure the knots.
Step 3
Apply your preferred hair oil or serum lightly to your hands. This will shield, hydrate, and keep the hair from frizzing as you pull it down.
Step 4
Grab a knot around the middle and turn it slowly counterclockwise to the hair’s direction of growth. Imagine doing this as you would removing the lid from a jar.
Step 5:
As you unravel the knot, the hair will become more loose and curl tightly into a little ball. Apply this method to every Bantu knot on your head.
Step 6
Apply a second thin layer if your hands are still covered in oil.
To avoid frizz, carefully separate each curl with your hands once your hair is no longer in twists. Apply this to your entire head.
Step 7
Lastly, style your baby’s hair.
Conclusion
A stylish hairstyle that keeps your hair safe and makes it look fantastic even when you take it down is a bantu knot!
No of the length or kind of hair, using the above instructions will quickly turn you into a Bantu knot expert despite how frightening and challenging they may seem!
Do YOU have any other fun or practical tips for making Bantu knots on your own? then post them in a comment to share with us and others!
Leave a Reply